GST Registration Procedure
GST registration is mandatory for most persons and entities supplying goods or services in India. In case of a person or entity supplying goods or services, GST registration becomes mandatory when the aggregate value of supply is more than Rs.20 lakhs. In case the entity is operating in a special category state, GST registration becomes mandatory when the aggregate value of supply is more than Rs.10 lakhs per annum. In this article, we look at the eligibility for obtaining GST registration, list of documents required and procedure for applying for GST registration online.

GST Registration Eligibility Criteria’s
The following are some of the major GST registration eligibility criteria in India.
Turnover Criteria
“Aggregate turnover” means the aggregate value of all taxable supplies (excluding the value of inward supplies on which tax is payable by a person on reverse charge basis), exempt supplies, exports of goods or services or both and inter-State supplies of persons having the same Permanent Account Number, to be computed on all India basis but excludes central tax, State tax, Union territory tax, integrated tax and cess.
If an entity has an aggregate turnover of more than Rs.20 lakhs, GST registration is mandatory. In special category state, the annual aggregate turnover threshold for GST registration is Rs.10 lakhs.
Inter-State Supply
If a supplier of goods supplies goods from one state to another, he/she would become liable for obtaining GST registration, even if the annual aggregate turnover criteria is not satisfied. Earlier, GST registration was mandatory even for suppliers of services when then provided inter-state supply. However, the GST Council later amended the regulation and now, service providers can provide services of upto Rs.20 lakhs inter-state or intra-state before having to obtain GST registration.
Supply through E-Commerce Platforms
Any person who supplies goods or services through an e-commerce platform is required to obtain GST registration mandatorily irrespective fo turnover. Hence, sellers on Flipkart, Amazon and other e-commerce platforms must obtain registration to commence activity.
Causal Taxable Persons
Any person who undertakes supply of goods or services periodically or through a temporary stall or shop must obtain GST registration mandatory, irrespective fo annual aggregate turnover.
Voluntary Registration
In addition to the above, any person can obtain GST registration voluntarily irrespective of turnover or any other criteria. Earlier, any person who obtained voluntary GST registration was not allowed to surrender the registration for upto a year. However, this provision has been modified and now, voluntary GST registration can be surrendered by the applicant at anytime.
GST Registration Types
There are various types of GST registration provided under the GST Act. While applying for a GST registration, the taxpayer must be aware of the distinctions between the registration and select the right one.
Normal Taxpayer
This category of GST registration will be applicable for most of the taxpayer who are running a business in India. To obtain normal taxpayer GST registration, the application would not have to pay a deposit. Also, a registration provided under the normal category will not have an expiry date.
Composition Taxpayer
This type of GST registration can be obtained for those wishing to enroll under the GST Composition Scheme. Taxpayers enrolled under the Composition Scheme can pay a flat GST rate. However, the taxpayer would not be allowed to claim input tax credit.
Casual Taxable Person
Casual Taxable Person GST registration can be obtained by those proposing to setup a stall or seasonal shop. To obtain a casual taxable person registration, the taxpayer must deposit an advance equal to the amount of GST liability expected during the period in which the GST registration would be active. Casual taxable person registration is normally provided for a period of upto 3 months and can be renewed or extended.
Know more about casual taxable person GST registration.
Non-Resident Taxable Person
Non-resident taxable person GST registration can be obtained by any person located outside of India who is supplying goods or services to residents in India. To obtain non-resident taxable person GST registration, the taxpayer must deposit an advance equal to the amount of GST liability expected during the period in which the GST registration would be active. Non-resident taxable person GST registration is normally provided for a period of upto 3 months and can be renewed or extended.
The above are the most common types of GST registrations in India. In addition to the above, other GST registration types are as follows:
- GST Registration for Non-Resident Online Service Provider
- UN Body / Embassy / Other Notified Person
- Special Economic Zone Developer
- Special Economic Zone Unit
- GST TDS Deductor – Government Entities
- GST TCS Collector – E-commerce Companies
Documents Required for GST Registration
The following is the list of documents required for obtaining GST registration:
| Proof of Constitution of Business (Any One) | Certificate of Incorporation |
| Photo of Stakeholder (Promoter / Partner) | Photo of the Promoter/ Partner |
| Photo of the Authorised Signatory | Photo |
| Proof of Appointment of Authorised Signatory (Any One) | Letter of Authorisation |
| Copy of Resolution passed by BoD/ Managing Committee and Acceptance letter | |
| Proof of Principal Place of business (Any One) | Electricity Bill |
| Legal ownership document | |
| Municipal Khata Copy | |
| Property Tax Receipt | |
| Proof of Details of Bank Accounts (Any One) | First page of Pass Book |
| Bank Statement | |
| Cancelled Cheque |
Click here for full list of documents required for GST registration.
GST Registration Procedure
GST registration can be done online through the GST Portal. On submission of a GST registration application, GST ARN is provided immediately. Using the GST ARN, the application status can be checked and queries if any can be replied by the applicant. Within 7 days of ARN generation, the taxpayer would receive GST registration certificate and GSTIN.
Step 1: Go to the GST Portal
- Access the GST Portal ->https://www.gst.gov.in/
- Click on Services -> Registration > New Registration option.

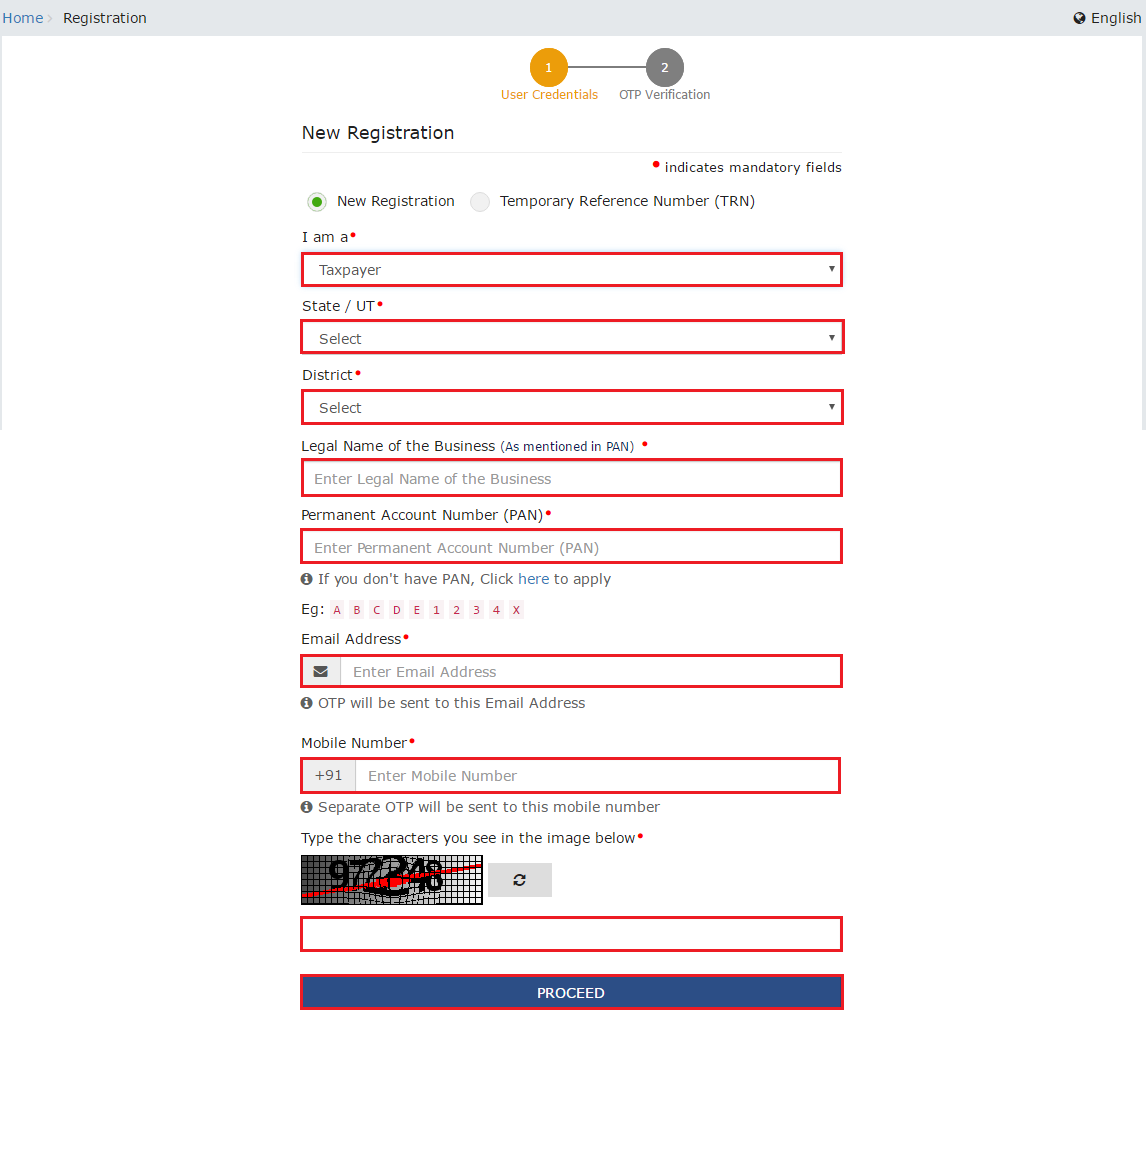
Step 2: Generate a TRN by Completing OTP Validation
The new GST registration page is displayed. Select the New Registration option. In case you left a GST registration application without completing, the section TRN number option can be used to continue to fill the old application.
- In the drop down list, select the Taxpayer type from the options provided.
- In the State/UT and District drop down list, select the state for which GST registration is required and district.
- In the Legal Name of the Business (As mentioned in PAN) field, enter the legal name of your business/ entity as mentioned in the PAN database. There will be an automated check with the PAN database. Hence, ensure the name is the same as in PAN. In case a wrong name is mentioned in PAN, apply for correction of PAN first.
- In the Permanent Account Number (PAN) field, enter PAN of your business or PAN of the Proprietor. GST registration is linked to PAN. Hence, in case of company or LLP, enter the PAN of the company or LLP.
- In the Email Address field, enter the email address of the Primary Authorized Signatory. (Will be verified in next step)
- In the Mobile Number field, enter the valid Indian mobile number of the Primary Authorized Signatory. (Will be verified in next step)
- Click the PROCEED button.
Step 3: OTP Verification & TRN Generation
On submission of the above information, the OTP Verification page is displayed. OTP will be valid only for 10 minutes. Hence, enter the two separate OTP sent to validate email and mobile number.
- In the Mobile OTP field, enter the OTP you received on your mobile number.
- In the Email OTP field, enter the OTP you received on your email address.
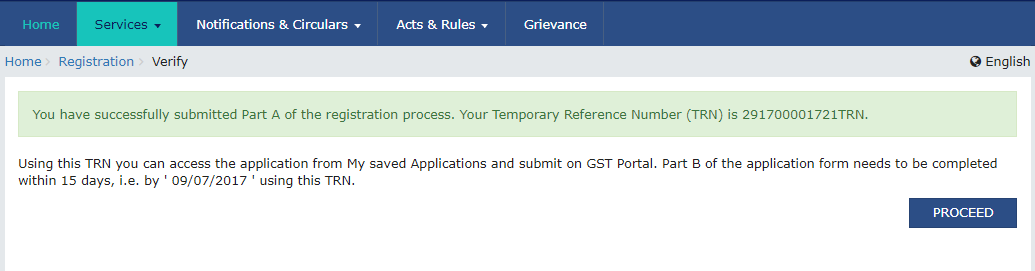
Step 4: TRN Generated
On successfully completing OTP verification, a TRN will be generated. TRN will now be used to complete and submit the GST registration application.
Step 5: Login with TRN
Now that TRN is generated, you can begin the GST registration process. In the Temporary Reference Number (TRN) field on the GST Portal, enter the TRN generated and enter the captcha text as shown on the screen. Complete the OTP verification on mobile and email. You will now be taken to the GST registration page shown below:
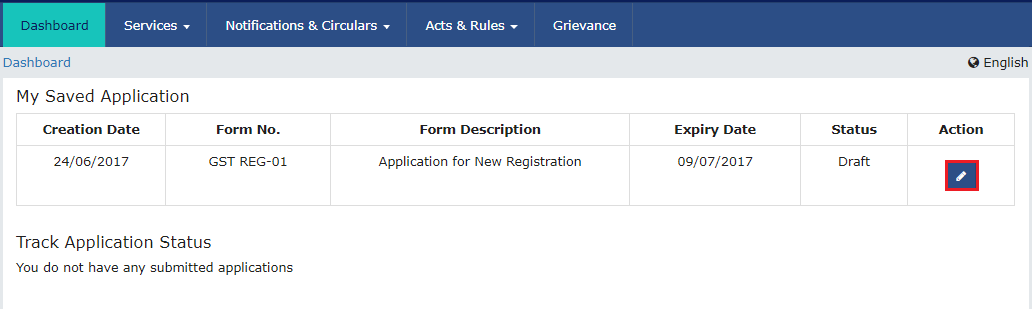
Click on the icon marked in red to start the GST registration process.
Step 6: Submit Business Information
Various information must be submitted for obtaining GST registration. In the first tab, business details must be submitted.
- In the Trade Name field, enter the trade name of your business.
- Input the Constitution of the Business from the drop-down list.
- Enter the District and Sector/ Circle / Ward / Charge/ Unit from the drop-down list.
- In the Commissionerate Code, Division Code and Range Code drop-down list, select the appropriate choice.
- Select if you would like to opt for the Composition Scheme.
- Input the date of commencement of business.
- Select the Date on which liability to register arises. This is the day the business crossed the aggregate turnover threshold for GST registration. Taxpayers are required to file the application for new GST registration within 30 days from the date on which the liability to register arises.

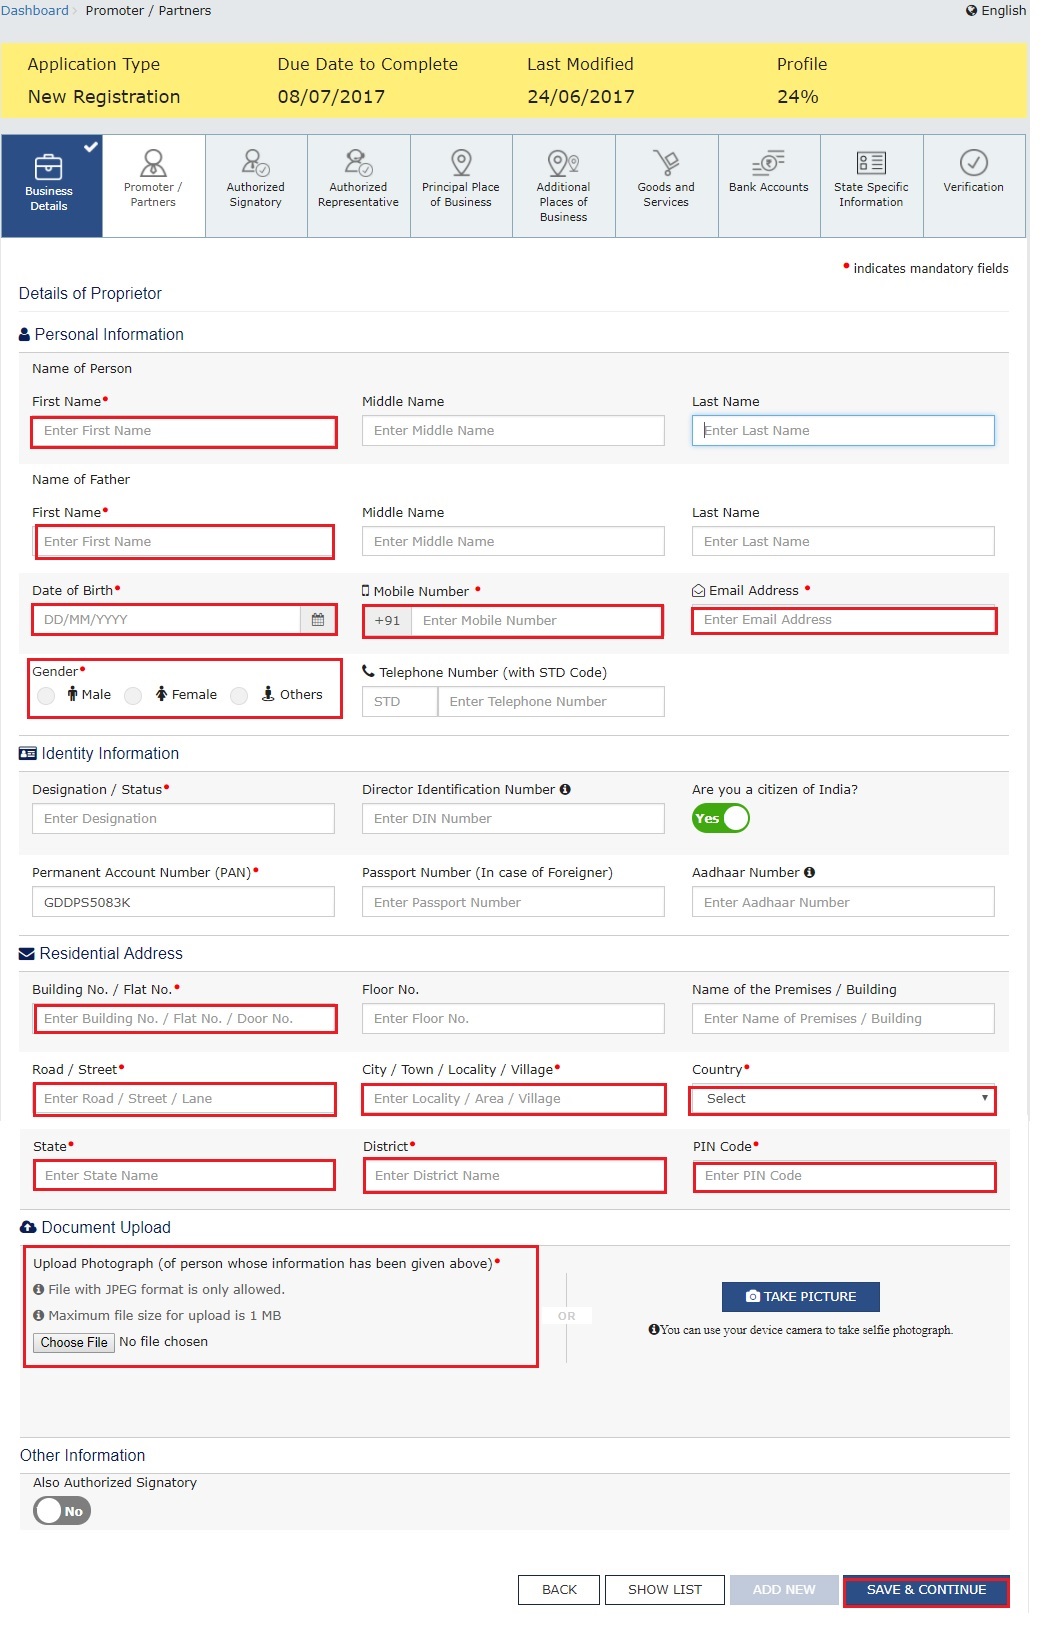
Step 7: Submit Promoter Information
In the next tab, details of the promoters of the business must be submitted. In case of a company, the directors information must be submitted. In case of proprietorship, the proprietors information must be submitted. Details of upto 10 Promoters or Partners can be submitted in a GST registration application.
The following details must be submitted for the promoters:
- Personal details of the stakeholder like name, date of birth, address, mobile number, email address and gender.
- Designation of promoter.
- DIN of the Promoter, only for the following types of applicants:
- Private Limited Company
- Public Limited Company
- Public Sector Undertaking
- Unlimited Company
- Foreign Company registered in India
- Details of citizenship
- PAN & Aadhar
- Residential address.
- Photo of promoter.
In case the applicant provides Aadhar, aadhar e-sign can be used for signing the GST returns instead of a digital signature.
Step 8: Submit Authorised Signatory Information
The authorised signatory is a person nominated by the promoters of the company to be responsible for filing GST returns of the company and maintaining the necessary compliance. The authorised signatory will have full access to the GST Portal and will be able to undertake a wide range of transactions on behalf of the promoters. The promoter of a company can also be an authorised signatory.
In case a promoter was selected as an authorised signatory in the previous section, this section will be auto-populated with the relevant details. The details required for authorised signatory is same as that of the promoters.
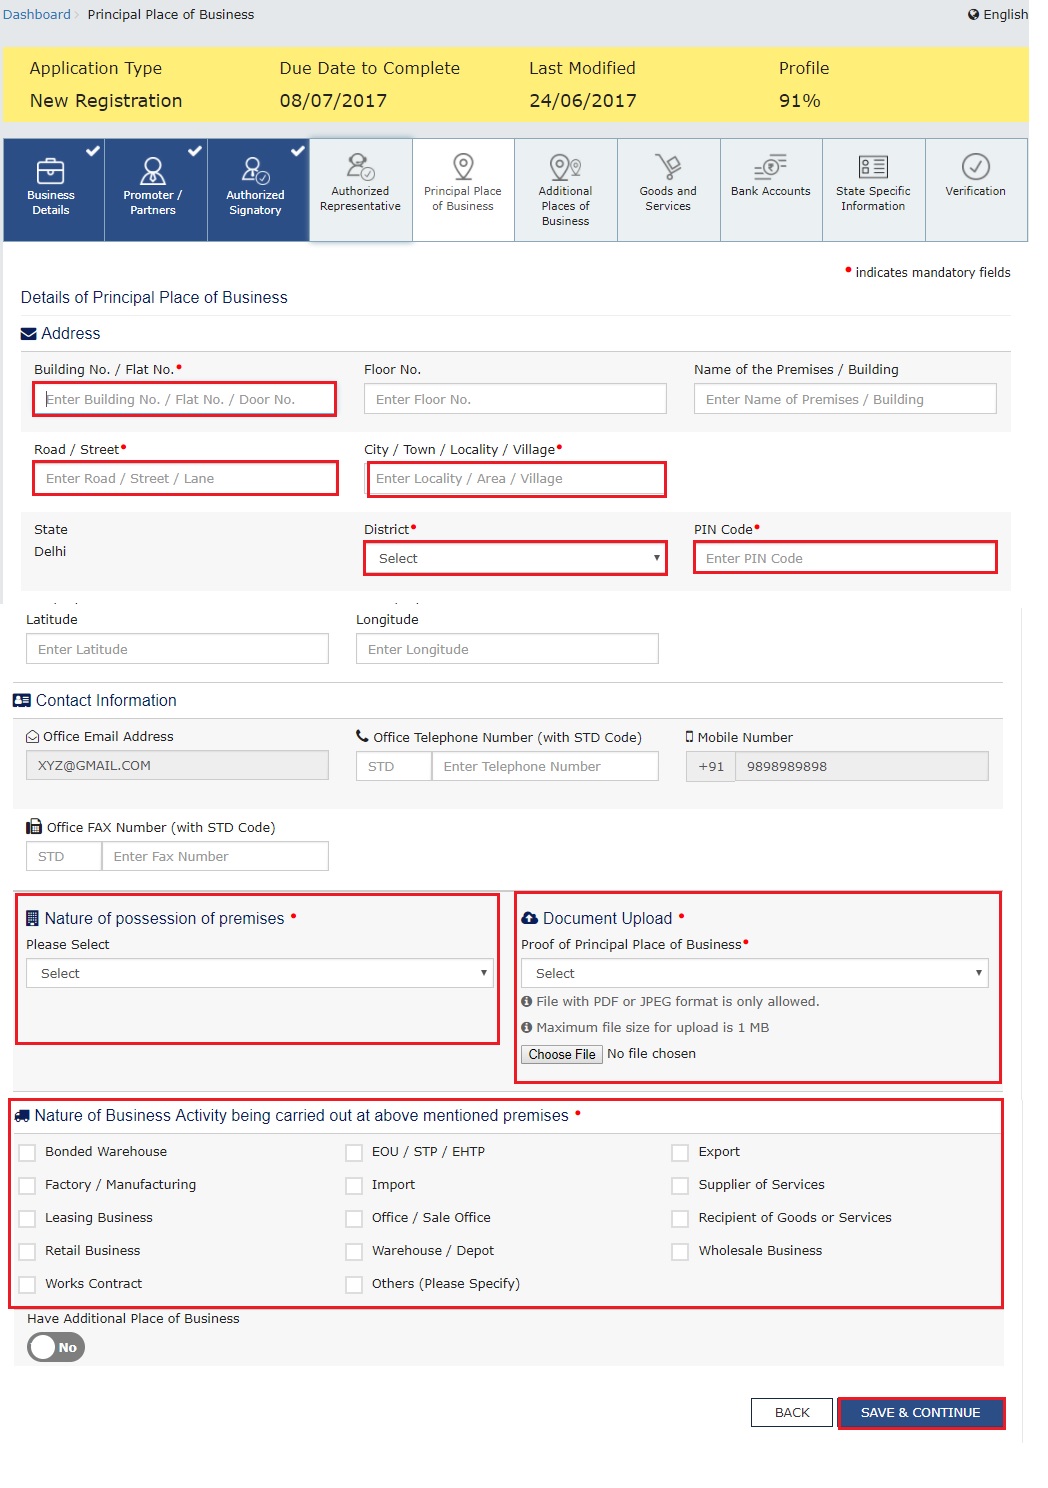
Step 9: Principal Place of Business
In this section, the details of principal place of business must be provided by the applicant. The Principal Place of Business is the primary location within the State where a taxpayer’s business is performed. The principal place of business is generally the address where the business’s books of accounts and records are kept and is often where the head of the firm or at least top management is located. Hence, in case of company or LLP, the principal place of business would be the registered office.
For the principal place of business enter the following:
- Enter the address details of the principal place of business.
- Enter the official contact details like Email address, telephone number (with STD Code), mobile number field and fax number (with STD Code).
- Select the nature of possession of the premises.
If the principal place of business is located in SEZ or the applicant is SEZ developer, necessary documents/ certificates issued by Government of India are required to be uploaded by choosing ‘Others’ value in Nature of possession of premises drop-down and upload the document.
In this section you will have to upload documents to provide proof of ownership or occupancy of the property as follows:
- For Own premises – Any document in support of the ownership of the premises like Latest Property Tax Receipt or Municipal Khata copy or copy of Electricity Bill.
- For Rented or Leased premises – A copy of the valid Rent / Lease Agreement with any document in support of the ownership of the premises of the Lessor like Latest Property Tax Receipt or Municipal Khata copy or copy of Electricity Bill.
- For premises not covered above – A copy of the Consent Letter with any document in support of the ownership of the premises of the Consenter like Municipal Khata copy or Electricity Bill copy. For shared properties also, the same documents may be uploaded.
Step 10: Additional Place of Business
In case you have additional place of business, enter details of the property in this tab. For instance, if you are a seller on flipkart or other ecommerce portal and use the sellers warehouse, that location can be added as an additional place of business.
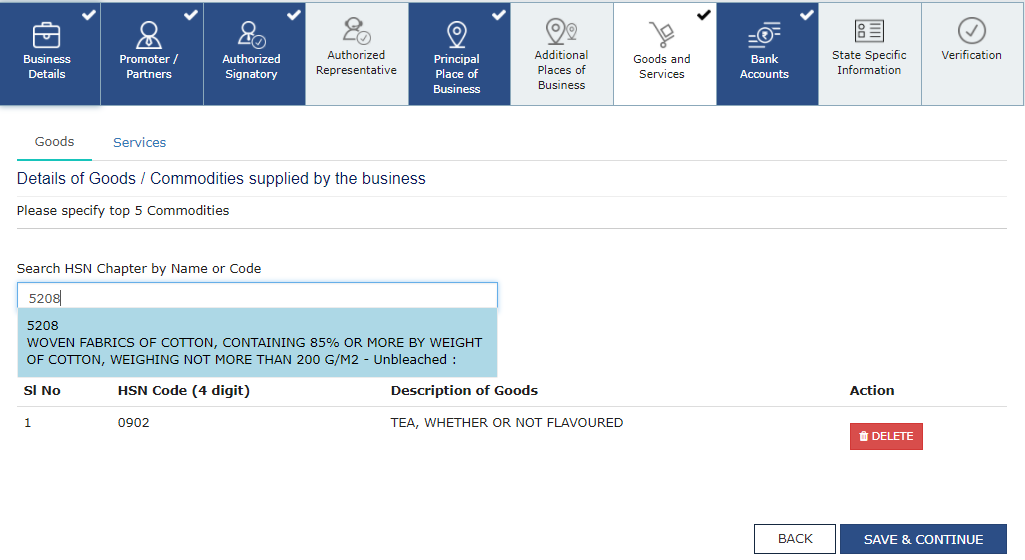
Step 11: Details of Goods and Services
In this section, the taxpayer must provide details of top 5 goods and services supplied by the applicant. This is just an indicative list and the business of the applicant will not be restricted in any way to the goods and services mentioned in this part.
For goods supplied, provide the HSN code and for services, provide SAC code. In case, you have more than 5 goods or services, you can add the top 5 goods or services you are dealing with.
Click here to find HSN code and SAC code.
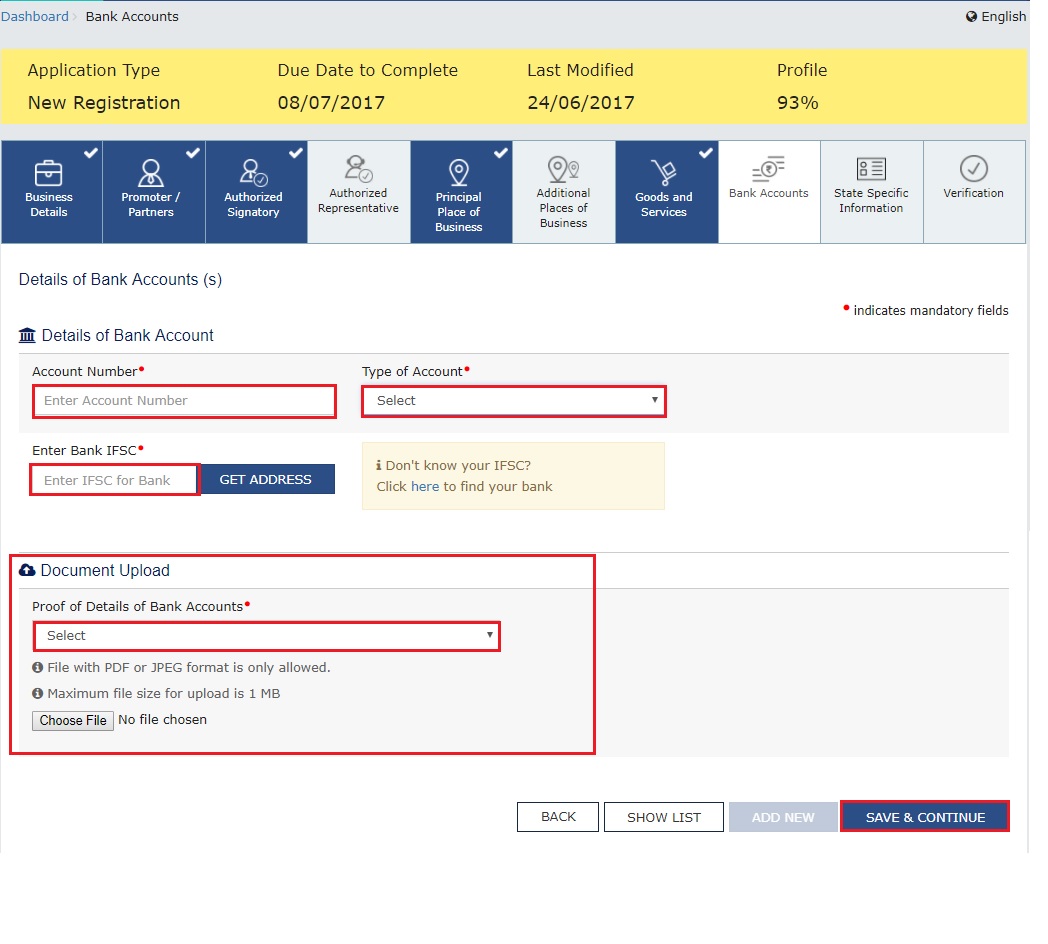
Step 12: Details of Bank Account
In this section, enter the number of bank accounts held by the applicant. If there are 5 accounts, enter 5. Then provide details of the bank account like account number, IFSC code and type of account. Finally, upload a copy of the bank statement or passbook in the place provided.
Step 13: Verification of Application
In this step verify the details submitted in the application before submission. Once verification is complete, select the verification checkbox. In the Name of Authorized Signatory drop-down list, select the name of authorized signatory. Enter the place from where the form is filled. Finally, digitally sign the application using Digital Signature Certificate (DSC)/ E-Signature or EVC. Digitally signing using DSC is mandatory in case of LLP and Companies.
Step 14: ARN Generated
On signing the application, the success message is displayed. You will receive the acknowledgement in next 15 minutes on your registered e-mail address and mobile phone number. Application Reference Number (ARN) receipt is sent on your e-mail address and mobile phone number. Using the GST ARN Number, you can track the status of your GST registration application.
No comments:
Post a Comment